This perfect cozonac recipe and method has been carefully developed and tested to help you achieve a perfect cozonac.

For Romanians cozonac is a very special holiday staple that's always on the table for Christmas and Easter.
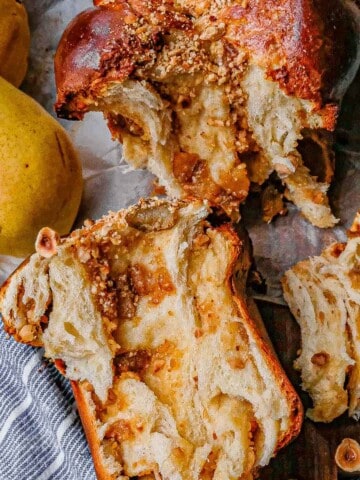
Cozonac is a yeasted dough that's enriched with eggs, milk and butter then sweetened and flavored with rum and lemon zest. Cozonac can be filled with various additions like cocoa, walnut, rum-soaked raisins, Turkish delight, and candied orange. I've also made cozonac with non-traditional fillings, like this caramelized pear and hazelnut cozonac.
If you follow the recipe and the method in this post, you'll be rewarded with a light, fluffy and pillowy cozonac with beautiful walnut swirls, just enough sweetness, and that oh-so-coveted gossamer texture that comes apart in featherlight strips.
This recipe has been through 10 development and testing rounds. Even so, there are so many variables that might be slightly different in your kitchen compared to mine, or in your ingredients compared to mine. There are helpful tips throughout for how the dough should look, and what to do if it's too loose or too tight.
If you want a condensed version then feel free to jump ahead to the recipe card at the bottom of the page.
Jump to:
What makes a perfect cozonac?
Cozonac falls into the broad category of holiday brioche, made in different ways by many countries, but us Romanians have a very specific vision of what makes a perfect cozonac.
Often you will hear Romanians describe an ideal cozonac as very 'pufos' or puffy/pillowy and having that special quality - 'se desface în fâșii' or in English, that it comes apart in thin sheets.
You can see what this means in this series of photos that show the very light and layered texture.
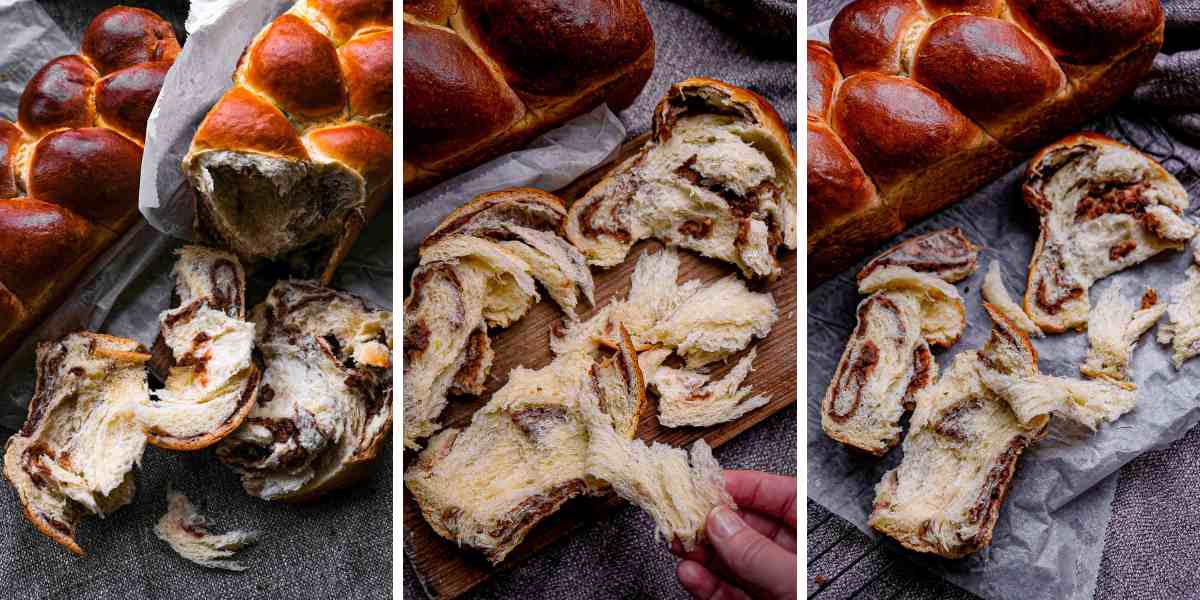
The main challenge to proper execution of this perfect texture is that fat retards the development of gluten. As a result, enriched doughs like cozonac need a very concerted focus on gluten development following a well-thought out method. You'll get that in the method here as well as cues to look out for to see if your dough has proper gluten development.
Another challenge to technical execution of cozonac is making sure the cozonac also looks nice on the outside. Again, you'll find tips here to execute on some really nice looking loaves, even if it's your first time.
Ingredients
For the dough
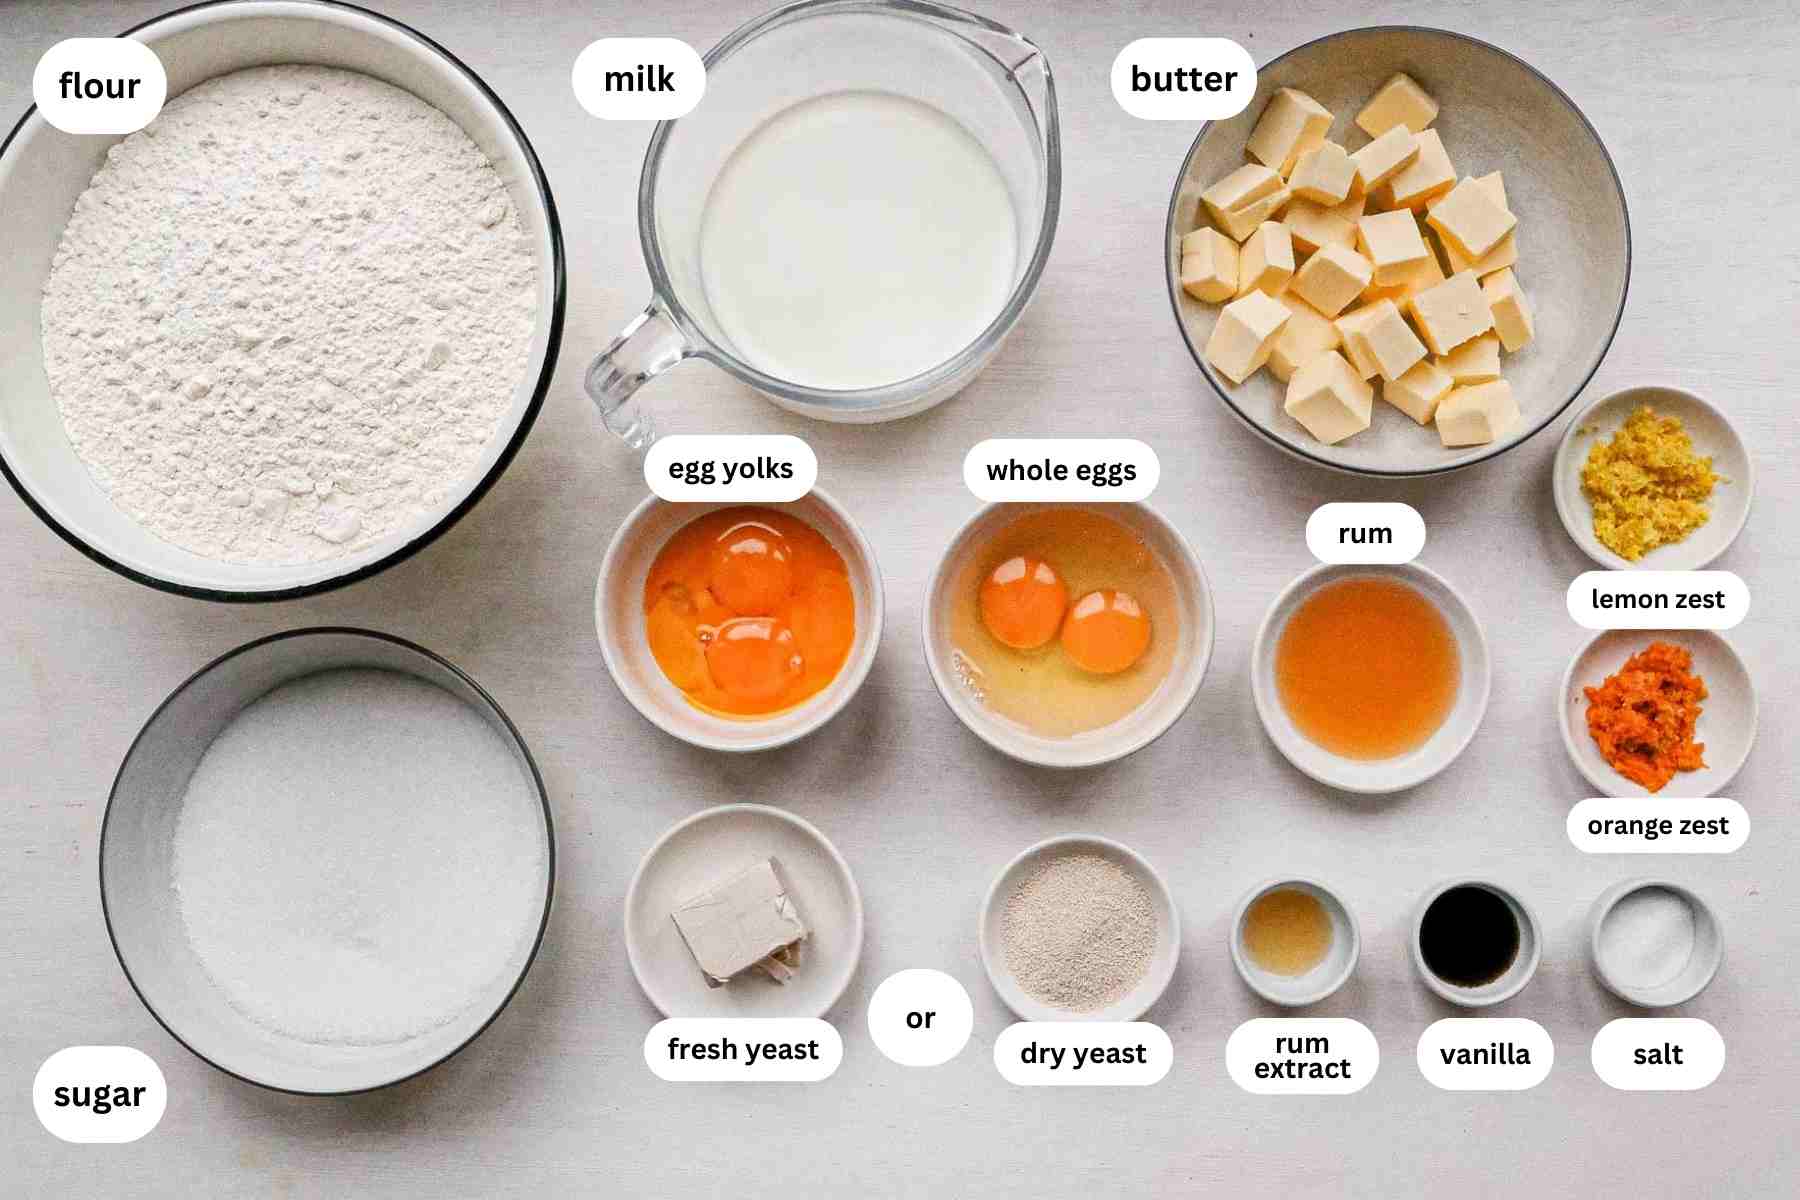
Base enriched dough
Flour
The best flour for cozonac is high protein white flour.
In many Romanian recipes the flour called for is Manitoba flour. This is a type of flour mostly known in Italy that is characterized by very high protein content of around 13% (i.e. 13 grams of protein for every 100 grams of flour).
You may also see a recommendation in other cozonac recipes for 00 or 000 flour. The 00/000 indications are just about the grind of the flour and not the protein content.
Protein content is more important than grind, so if all you can find is regular bread or pizza flour with a protein content of at least 12% then that's better than 00.
If you're in the US, King Arthur Unbleached All Purpose Flour is a good option. In Canada, Five Roses Bleached All Purpose White Flour is a good option. If you're anywhere in Europe/the UK then you shouldn't have a hard time finding a good Italian bread or pizza flour with sufficient protein content at your local supermarket.
A note on sifting: I did not sift the flour when developing or testing this recipe. I've seen testing done by trusted bakers that prove sifting doesn't make the dough lighter. Still some people swear by it. It's up to you if you want to sift or not, but as far as this recipe goes isn't necessary to achieve the texture pictured.
Milk (lukewarm)
Milk is the main source of moisture in the recipe.
White sugar
This recipe calls for white sugar which is the traditional choice for cozonac. Substituting brown sugar may alter the moisture balance and color.
Eggs & egg yolks
The dough is made with both whole eggs and egg yolks. The eggs enrich the dough, give it more body/structure and also a nice golden color from the yolks.
Butter (unsalted and softened to room temperature)
If you are starting with fridge-cold butter, you can also cube it and pop it in the microwave for 10-15 seconds - just enough to soften it. If a little bit of it melts that's okay too.
Salt
The salt does more than flavor the dough. Salt has a stabilizing effect on the gluten structure.
Don’t just throw in a pinch. It needs the full amount indicated in the recipe card to balance the other flavors and contribute to the gluten development. The 12 grams indicated may seem like quite a lot - it's about a tablespoon - but don't be put off by this.
Yeast
You can use either dry yeast (active dry or instant) or fresh yeast for this recipe. There is absolutely no difference in the final cozonac - fresh yeast just seems a bit more explosive in the earlier stages of the recipe as you can see in this series of photos taken during recipe testing.

If you use active dry yeast, be sure to bloom it so you don't realize too late if it's expired. Some people say this isn't necessary but I've learned the hard way to always test my yeast so I recommend you do so too - it only takes a few minutes more and can save you a lot of time and potentially wasted ingredients.
Active dry yeast will bloom in 10-15 minutes while instant yeast only takes about 5 minutes.
If using fresh yeast then you don't need to bloom it.
Dough Flavoring Ingredients
- Spiced rum & rum essence: Spiced rum / rum essence is a traditional flavor of many Romanian desserts. The classic choice for rum is the Austrian spiced rum Stroh in 38 proof. The alcohol content burns off during cooking so all that's left is the flavor. For rum essence I used Coseli Romanian Rum Essence. You may be able to find this at your local Romanian supermarket (if you have one in your area). You can also use another type of rum essence. If you want to omit the spiced rum, be sure to compensate for the missing liquid with some water (not milk, which will add more protein and fat).
- Lemon and orange zest: Lemon zest is expected in cozonac but orange zest adds another layer of flavor and warmth which I love. You can also play around with this by using zest as well as some homemade candied orange peel. One whole naval orange makes enough candied orange for a very orange forward cozonac. You can also add it to the filling if you prefer.
- Vanilla: I used Nielsen Massey vanilla bean paste but you can substitute it for vanilla extract or a whole scraped vanilla bean. If you use a vanilla bean you can soak the bean in the milk to make sure you get it all. Then use the milk as indicated.
You can see the full quantities in the recipe card at the bottom of the page.
Ingredients that don't need to go in cozonac dough
There are a lot of cozonac recipes out there that call for dairy in the form of yogurt, sour cream, heavy cream etc.
These ingredients are just different ways of adding fats and proteins. They aren't strictly necessary and you can achieve perfect cozonac dough without them.
My personal view is that cozonac has enough ingredients so why make the list longer if it isn't necessary.
The same goes for honey - it's just a different way of introducing water and sugar - which are already in the cozonac. Likewise, with all the other flavoring ingredients in the dough, the addition of honey wouldn't have a major impact on flavor.
Again, just my own view and the recipe here is a reflection of that.
For the filling

Cozonac filling is about personal preference, good moisture balance, and not overfilling.
This filling contains the following:
- Dry ingredients: Walnuts, sugar, cocoa powder, cinnamon, salt.
- Wet ingredients: Milk, rum, butter, egg white.
In terms of flavor profile, walnuts and cocoa are a crowd favorite but there are also ways to jazz it up (add pecans, whole nuts for texture, chopped chocolate for decadence, candied orange peel for more orange flavor, or soak a quarter cup of raisins in the rum and milk before mixing it all together) or go in a different direction (Turkish delight!).
Since this recipe is for two cozonaci, if you like you can also cut the filling recipe in half to do one cozonac with cocoa walnut and the other with a different filling, maybe something non-traditional.
For example, you can prepare a batch of caramelized pear filling following the filling directions in my caramelized pear and hazelnut cozonac recipe.
From a technical perspective, the filling should be neither too wet not too dry as this can affect the shape and taste of the cozonac.
It also shouldn't be too much so it doesn't make the cozonac lumpy. If you want to make your own additions to the filling, just be careful to not substantially change the moisture balance of the filling or overfill the dough.
Equipment
Loaf pans
You will need two loaf pans for this recipe.
This recipe has been tested for the following loaf pan sizes:
- Small standard loaf pan measuring 25cm long by 10cm wide (internal dimensions), 8cm deep with a capacity of 1.7 liters / 7 cups. Or 9.5" long by 4" wide by 3" tall in US standard measures.
- Large standard loaf pan measuring 30cm long by 12cm wide (internal dimensions), 9cm deep with a capacity of 2.4 liters / 9.75 cups. Or 12" long by 5" wide by 4" tall.
If you are using a pan that's substantially different from these dimensions, you may need to make your own adjustments to the baking time.
The loaf pans are metal and prepared with a mixture of butter and flour to make them non-stick. You can also use loaf pans made from other materials like ceramic, glass, enamel or silicone but prepare them accordingly.
Stand mixer: A stand mixer is crucial in this recipe because it does a lot of the heavy lifting in terms of gluten development. I use a KitchenAid Artisan Mixer with the dough hook attachment. You can use other types of mixers, see instructions for details on mixing speed. If you don't have a mixer you can try kneading by hand or doing a no-knead method by adapting the method described in this King Arthur Flour Recipe for Strawberry Swirl No Knead Brioche. I haven't tested those methods with this recipe so I can't guarantee the results will be the same as the ones shown here.
Food processor: The food processor makes it much easier to make the filling for the cozonac if you're starting with whole walnuts. You can also do without if you have another preferred method for grinding the walnuts down or can buy them already ground.
Aluminum foil: Aluminum foil is necessary to cover the cozonac while it's baking so it doesn't' get too dark.
Baking paper: The baking paper makes it a bit easier to move the cozonac into the loaf pan and then take it out. It isn't necessary but makes things a bit easier.
Pastry brush: A pastry brush or fine basting brush makes it easier to apply the final eggwash on the cozonac. You can also do this gently with your fingers if you don't have a pastry brush.
Instructions
Quick Summary Instructions
Here is a brief summary of the steps involved to make the dough:
Step 1: Make the sponge with a portion of the ingredients and let it rise in a warm oven (50 C / 120 F) for 15-20 minutes until bubbly;
Step 2: Add the sponge to the bowl of the stand mixer with the rest of the dough ingredients except the butter.
Step 3: Start the mixer on low and set a timer for 10 minutes;
Step 4: After 10 minutes, set a timer for 20 minutes and begin adding the butter slowly. After a total of 30 minutes of mixing the dough is ready for the first proof.
Step 5: Proof in a warm oven (50 C / 120 F) for 20 minutes. Do 3-4 stretch and folds. Then put back in warm oven for 20 minutes, followed by another round of stretch and folds. Repeat once more (for a total of 60 minutes in the oven) then take the dough out of the oven and do your final stretch and fold then leave it to cool and rest at room temperature for 15-20 minutes.
Step 6: While the dough is proofing, you can make the filling.
Step 7: After the final rest the dough is ready to divide, roll out and shape. Cut the dough into two equal pieces. Cover one of them while you roll out the other.
Step 8: Cut the dough again into either 2 pieces (to make a twist shape) or 3 pieces (to make a braid shape) and roll out each of the pieces.
Step 9: Distribute the filling equally for all the pieces of dough and spread on in a thin layer.
Step 10: Roll the pieces of dough into carpet-like rolls, then bring together the ends of the rolls and either twist (if two pieces) or braid (if 3 pieces).
Step 11: Move to prepared loaf pan, final proof and bake.
How to use temperature to speed things up
The method here has been developed to get maximum gluten development in the shortest amount of time. The best way to speed the whole process up is to make liberal use of the warming function on your oven. Not just the light, but actual warming.
I learned this handy trick from my aunt, who pointed out that my method of proofing in a warm kitchen ( around 22C / 70F) is the reason it was taking me 8+ hours to make this cozonac. She shared with me that she makes her cozonac in 4 hours flat from start to finish by proofing it in a warm oven (in her case she proofs at 80 C / 175 F.
Normally when you make bread you want a longer ferment since it develops flavor. But in the case of cozonac, there's so much flavor in the dough from the fats and flavoring ingredients that in my testing, a long ferment (5+ hours at room temperature or overnight in the fridge) doesn't make much of a difference.
Just be careful not to overdo it. Don't proof for longer or at a higher temperature. More is not better in this case. It's also possible to over-proof and blow out your dough, exhaust the yeast before showtime and end up with a flat or dense cozonac.
Detailed Instructions
How to make the cozonac dough
Step 1: Make the sponge.
A sponge, sometimes called maiaua in Romanian or levain in French, is a preferment which gives the gluten development a head start.
You make a sponge by mixing a portion of the ingredients together - in this case you will mix:
- 200 grams flour
- 200 grams lukewarm milk
- All of the yeast
You can also bloom the yeast to test it by adding it to the milk first.
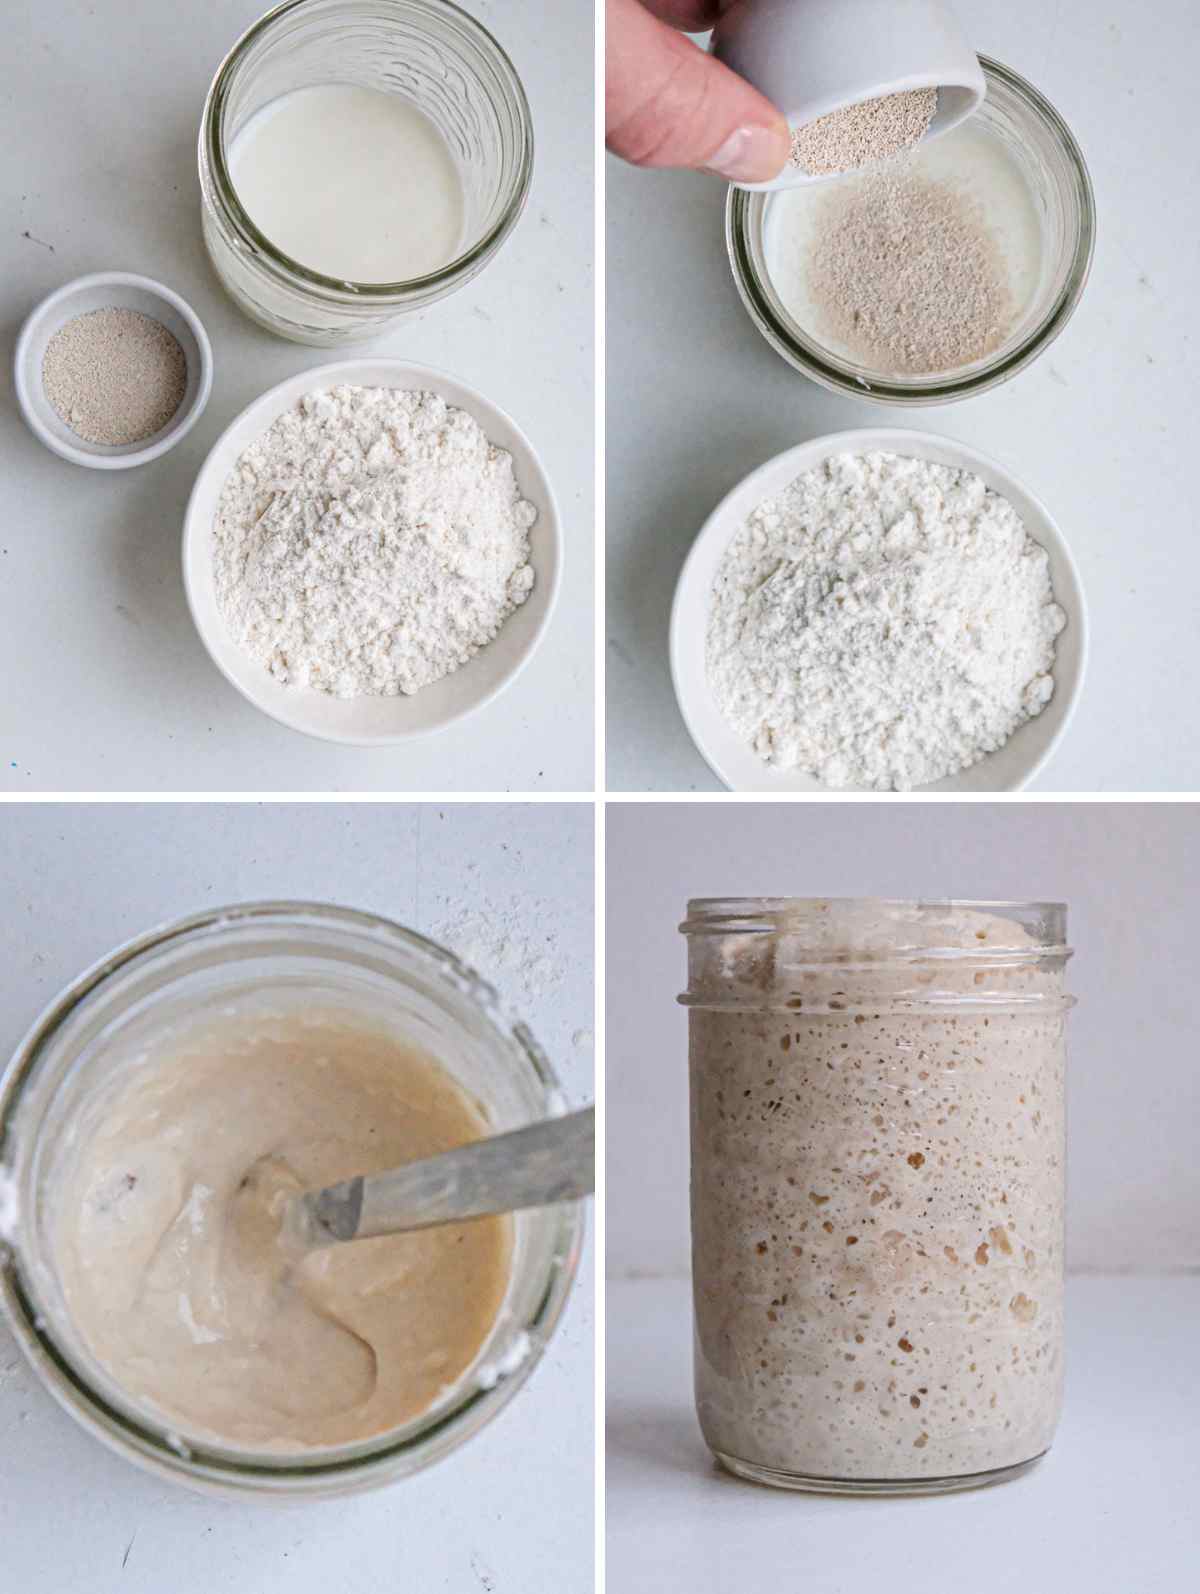
After mixing up the sponge, put it in a warm oven (50 C / 120 F) until it gets very bubbly, as shown in the last photo below. This usually takes 15-20 minutes.
You can use the time the sponge is rising to measure out the other ingredients.
How should the sponge look?
You can see in the photo below the sponge is bubbly and has doubled or tripled in volume (depending on the type of yeast you're using). When you mix it with a spoon, you should see that the texture shows thick, ropey strands - that's the gluten. If you don't see that, allow it to continue rising another 15 minutes. If it still hasn't rise, it could be an issue with your yeast.
Step 2: Mix the sponge with the other ingredients.
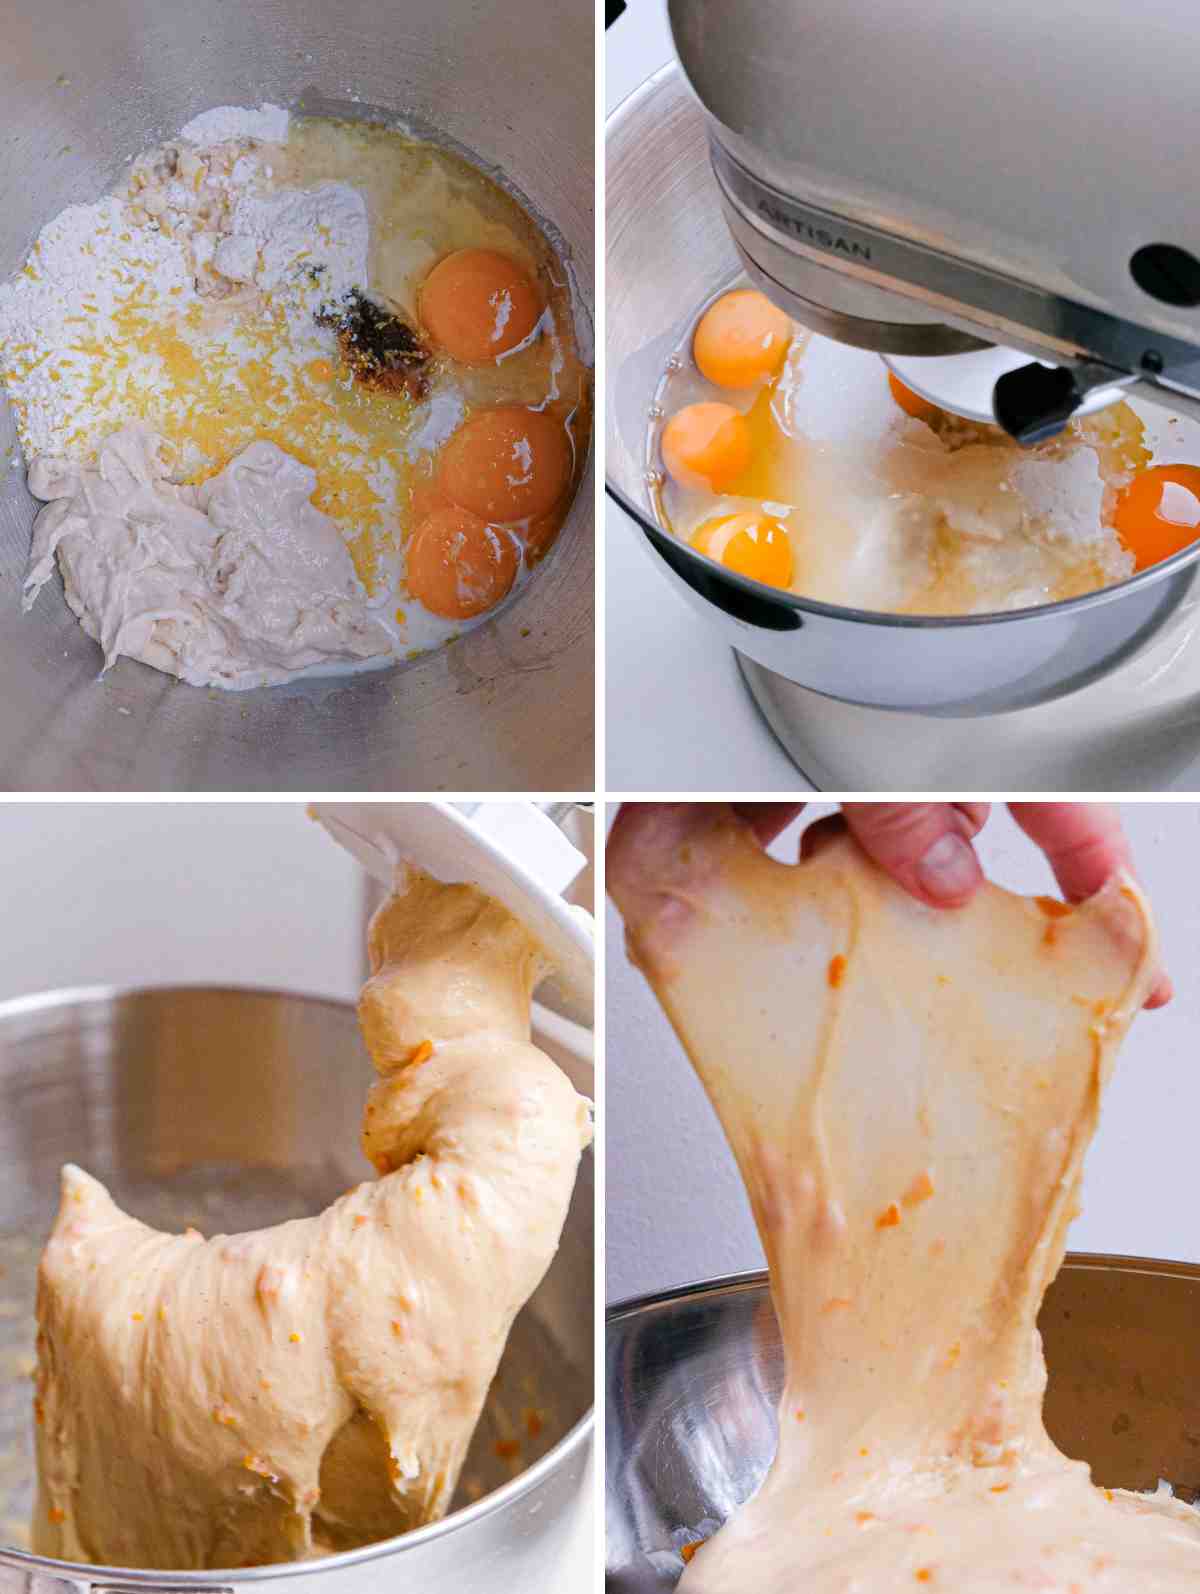
Add the rest of the dough ingredients (except the butter) to the bowl of your stand mixer with the dough hook attachment on. I find it helps to put the milk in first. If you put flour in first, it can stick to the bottom of the bowl and not get incorporated.
Careful not to forget to add the sponge - it's easier than you think.
Step 3: Start the mixer on low and set a timer for 10 minutes.
The initial mixing of 10 minutes helps to already develop a good gluten structure before the fat (butter) is added.
On my KitchenAid mixer I found the best speed to be either speed 1 or speed 2. KitchenAid calls these speeds 'stir' and 'slow mix'. Different mixers will have different speed indications.
Step 4: After 10 minutes, set a timer for 20 minutes and begin adding the butter slowly.
After a total of 30 minutes of mixing the dough should be ready for the first proof.
How to know when the dough is ready?
You can see in the third photo below the texture the dough should have. It should be tight enough to cling to the dough hook for 15-20 seconds before slowly sliding off.
If you pick up a portion of it in your hand, it should be very stretchy - you can see this in the photo series in the next section.
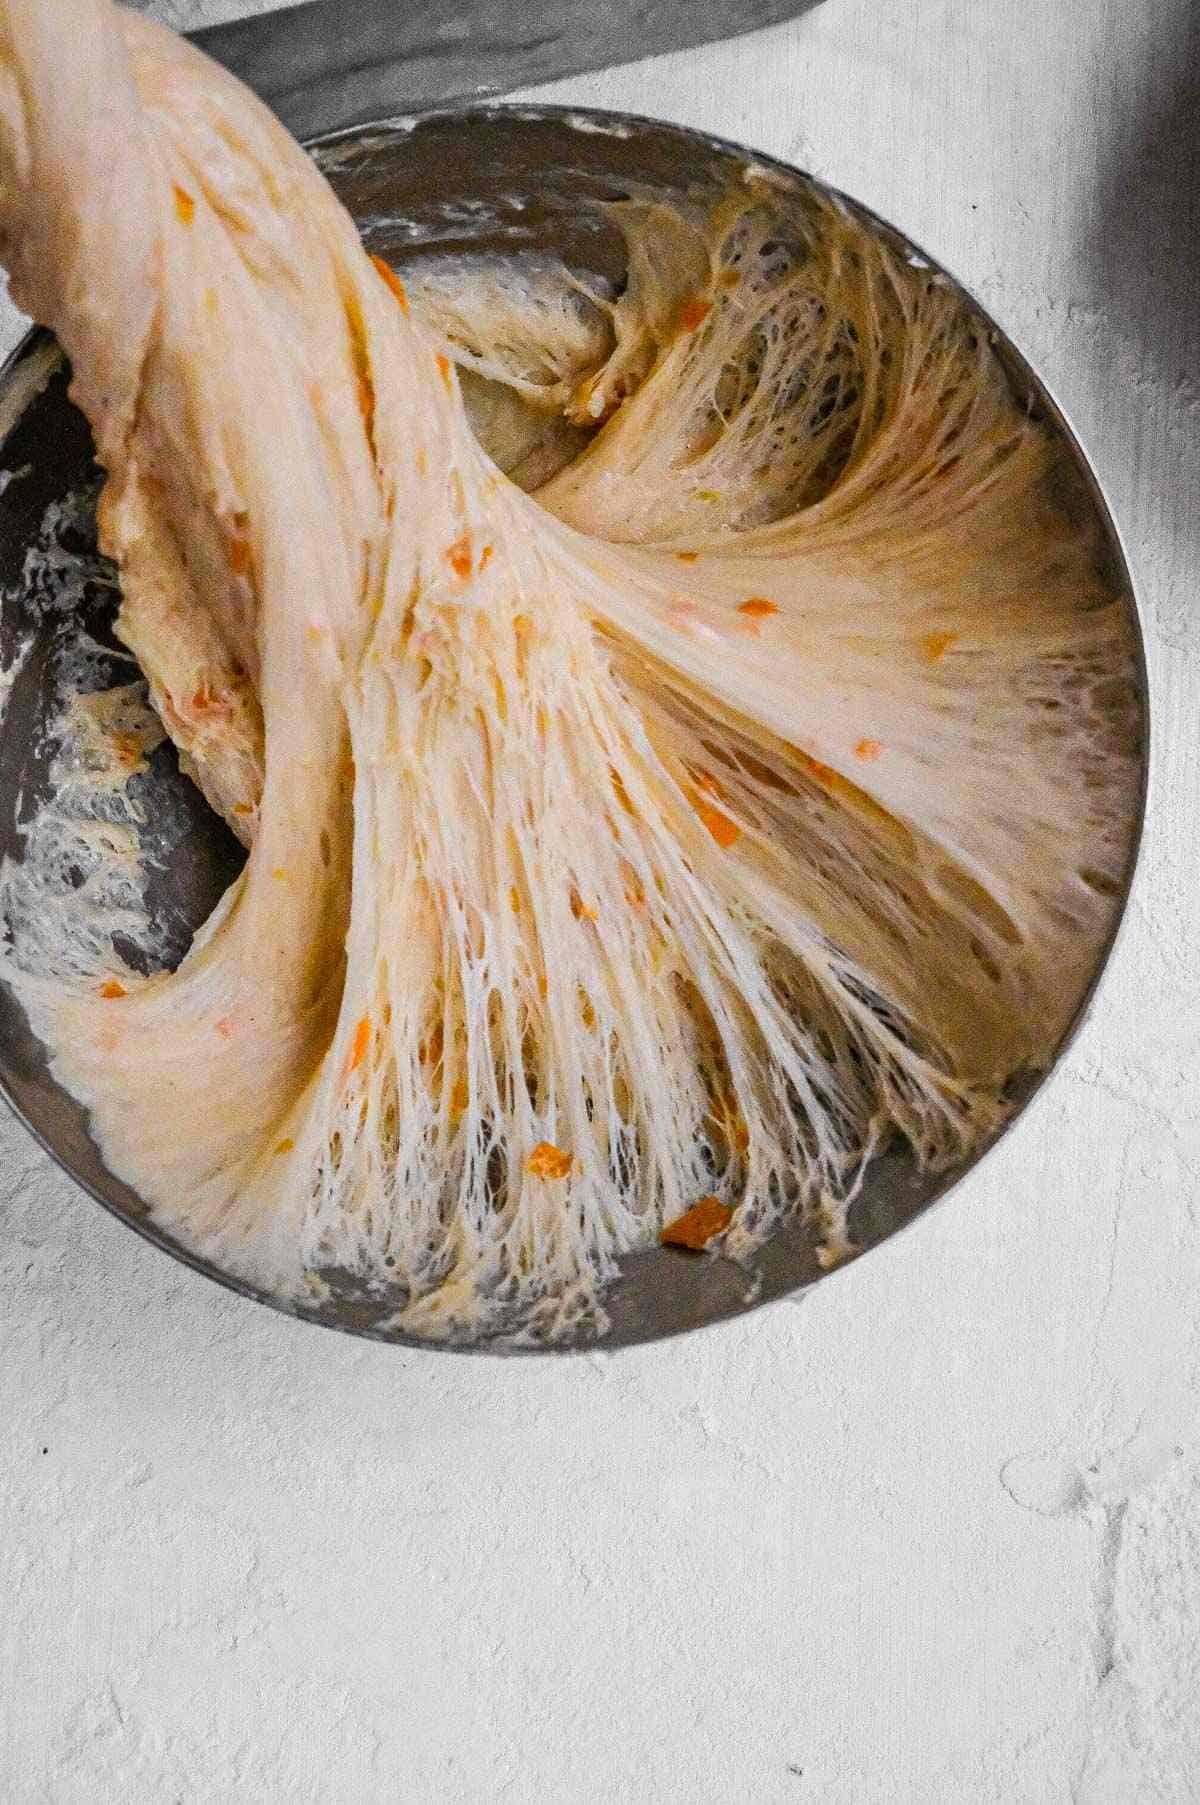
You can test the dough by doing the 'window pane test' as shown in the last photo. Stretch a portion of it out thin enough that the light passes through.
If your dough doesn't look like this at this stage, please see the troubleshooting section under the recipe card.
Step 5: Proof, stretch and fold.
Put the dough in a warm oven (50 C / 120 F) with a timer set for 20 minutes. Setting a timer is recommended because if you leave the dough in the warm oven too long, it can overproof.
After the initial 20 minutes you may not notice a significant amount of rise in the dough. That's okay.
Take the dough out and do a series of stretch and folds. You do this by picking the dough up in the middle and lifting so that it stretched into a rope. then fold that rope over on itself, ideally capturing a bit of air in the fold as you do.
Do 3-4 stretch and folds. Then put back in warm oven for 20 minutes.
After the second 20 minute proof in the warm oven, you should start seeing a lot of rise. See the photo below to get an idea. Do another series of stretch and folds, followed by another round of proofing in the warm oven.
This will mean a total of 60 minutes in the warm oven.

At the end of the 30 minutes or mixing and 60 minutes of warm proofing, you should have a beautiful and robust gluten network as you can see in the photo below.
How to make the cozonac filling
Step 6: While the dough is proofing, you can make the filling.
If you have a food processor, the easiest method is to whip up the filling in the food processor.
First add all the dry ingredients and process until you have a smooth, fine and even consistency. Then add the wet ingredients and pulse a few times until you have a thick paste as shown in the photo.
The filling really needs to be a paste in order to spread well so be sure not to undermix and leave it chunky - if you want chunks you can reserve a portion of the nuts (there are clear instructions in the recipe card).

How to shape the cozonac
Step 7: After the final rest the dough is ready to divide, roll out and shape.
Cut the dough into two equal pieces. I prefer to actually weigh out the pieces to make sure they are equal, which makes for more consistent results.
For reference this dough should weigh approximately 1650 grams, which is enough for two cozonaci. When cut into two, each piece makes one cozonac and should weigh 825 grams.
This can vary depending on your ingredients and any additions you make to the filling, so if you really want consistency the best option is to weigh it out.
Since it's a lot of dough, you'll have an easier time making one cozonac at a time. Cover the remaining piece of dough while you roll out the first so that it doesn't dry out.
Then when the first piece is in the loaf pan, leave it at room temperature while you roll out, fill and shape the second one. Then you can proceed with final proof of both loaves at the same time.
Step 8: Cut and roll out the dough.
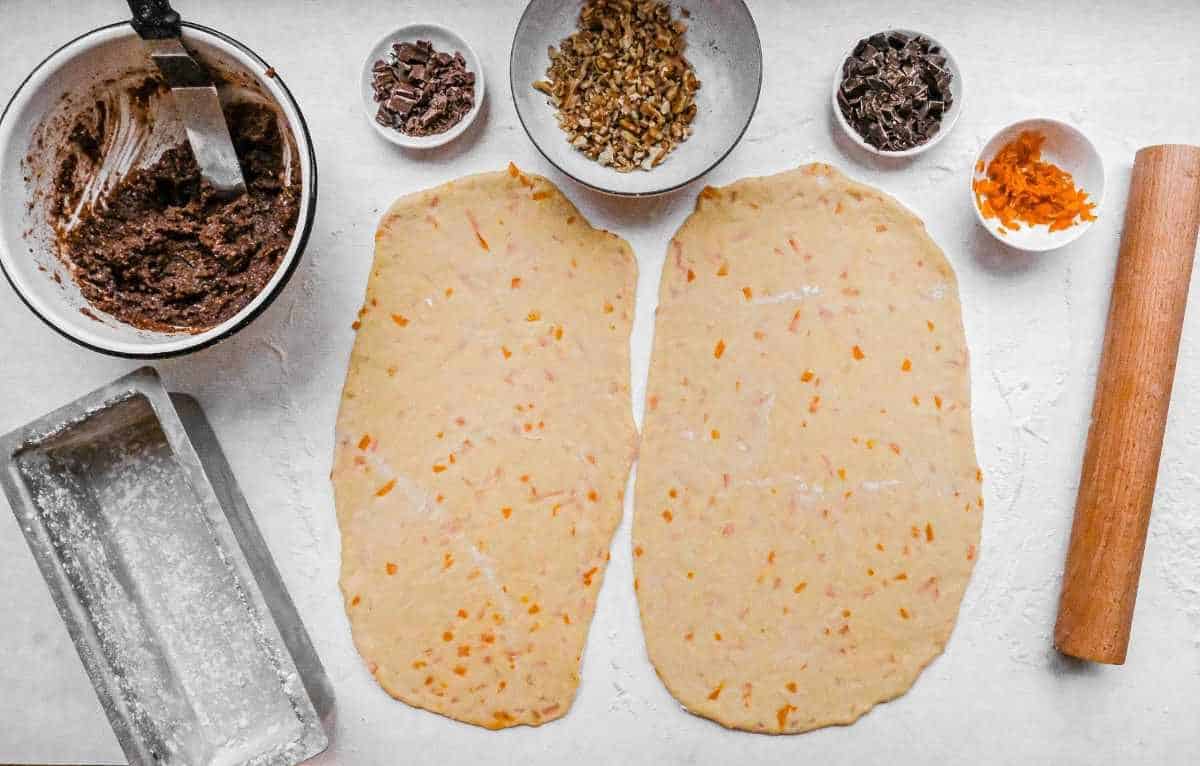
To make a twist, you'll need to cut the dough into 2 pieces weighing about 412 grams each for a twist. To make a braid, you'll need 3 pieces weighing about 275 grams each.
Once all the pieces are cut you need to roll them out. They should be at least 10 cm / 4 inches longer than the loaf pan on either side. The width should be at least wide enough that they can be rolled into a carpet with 2-3 rotations.
The thickness you roll the dough to will really depend on satisfying the conditions above. Likely it will be somewhere between a centimeter / 0.40 of an inch to half a centimeter / 0.20 of an inch.

Step 9: Distribute the filling equally on the pieces of dough in a thin layer.
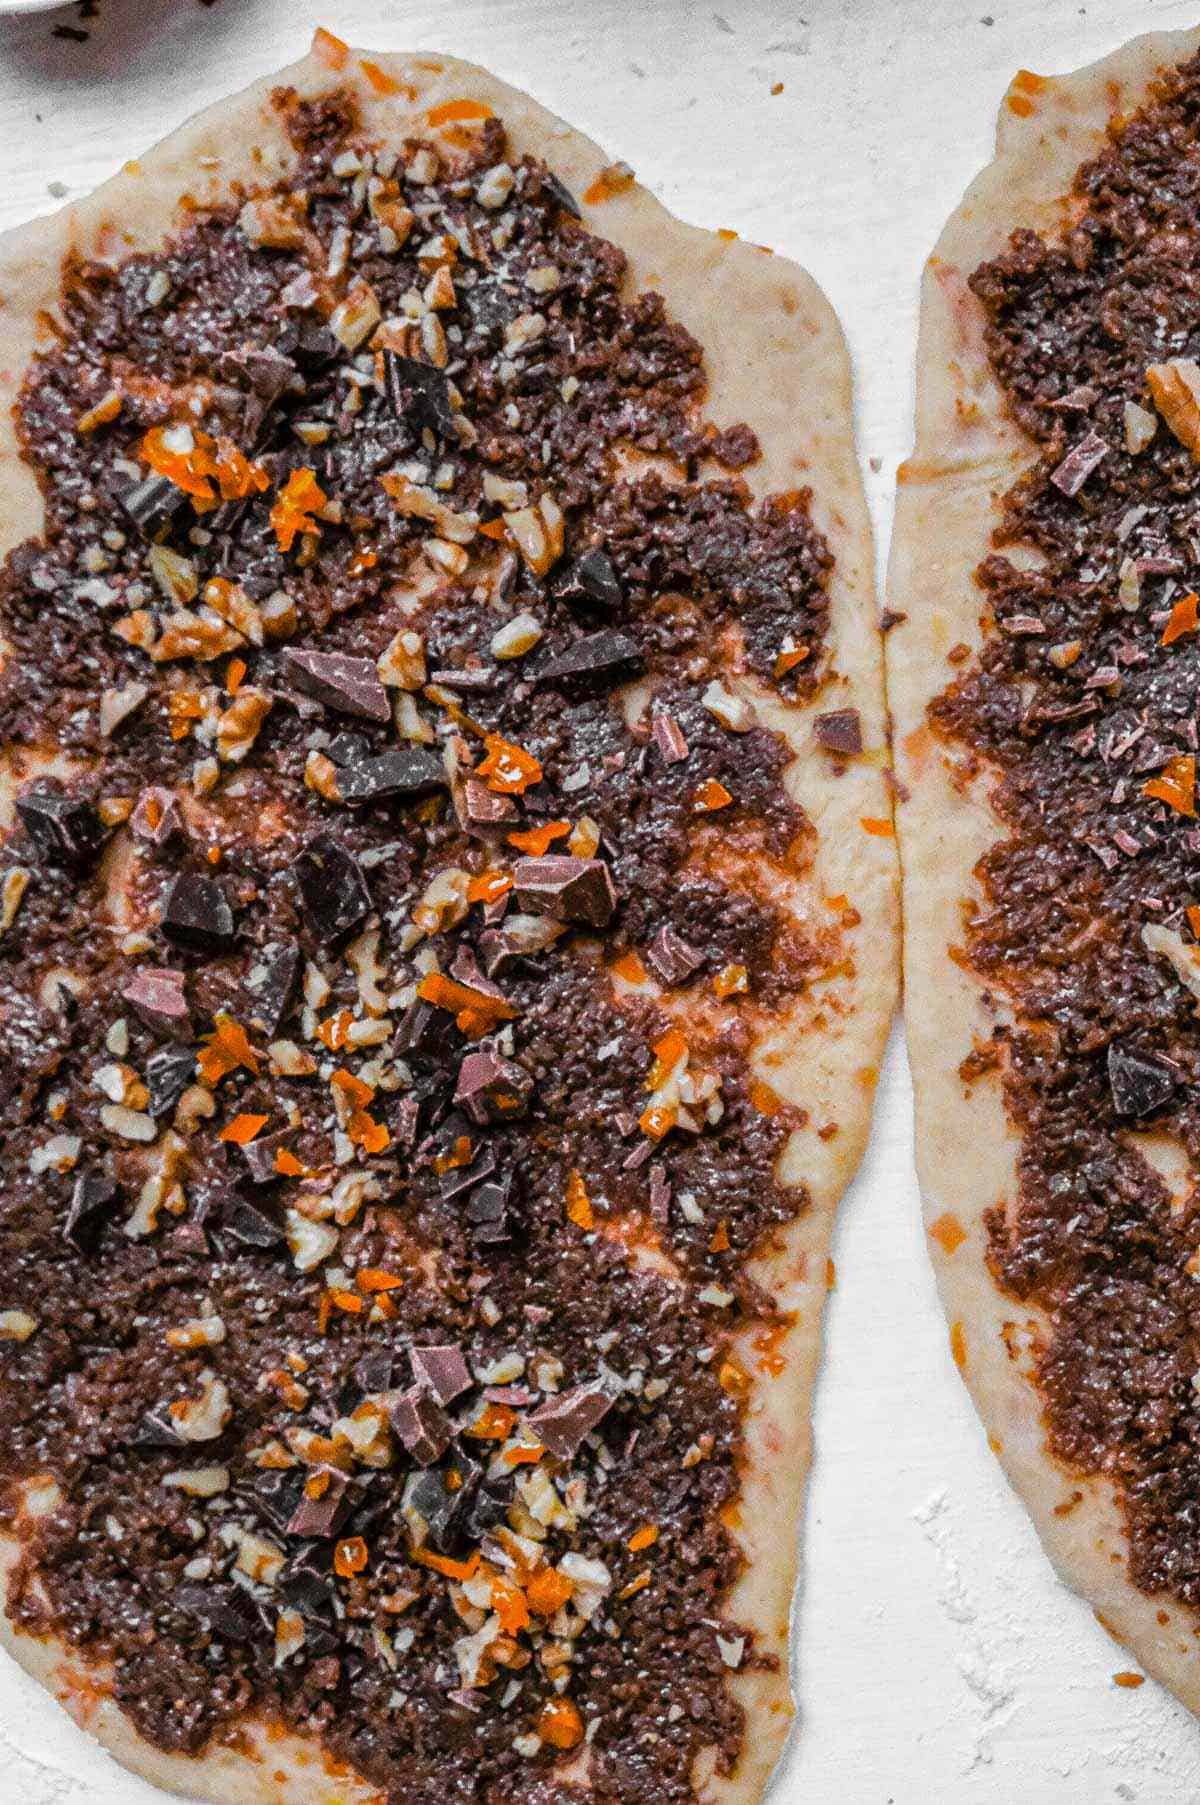
Gently spread the filling all over the dough. Again, for most consistent results the best option is to weigh it out and divide it up into the number of pieces of dough you have. My filling usually weighs about 700 grams total, so around 350 grams per cozonac.
After you've spread out the filling, you can add any additions you like. For example, if you reserved some of the nuts for texture.
Other nice additions are chopped chocolate (a few tablespoons of dark or milk chocolate chopped into chunks), rum soaked raisins, Turkish delight, or homemade candied orange peel.
Step 10: Shape the dough.
Roll the pieces of dough into carpet-like rolls, then bring together the ends of the rolls and either twist (if two pieces) or braid (if 3 pieces).
Before you start twisting or braiding be sure the seam on the dough is fully closed or it might open and give you a hard time. You can do this by positioning them seam side down, and gently pressing.
When twisting or braiding, keep in mind that the final shape and size of the loaf should fit into the loaf pan. If it's much wider, you might get some puckering on the edges. A properly prepared pan or using parchment paper helps this (both described below).
Pro tip: To make your life easier when you transfer the twisted or braided loaf into the loaf pan, you can use some parchment paper to move the loaves.
Cut the parchment paper to a little less than the width of your loaf pan, then slide it under the rolled up dough after you've finished rolling it out. You can see what I mean in the photos of the braided loaf below.
Twisted cozonac: the easier option

The twist is the easier shape to master. If it's your first time, take it slow and be gentle. If it doesn't look right, you can still move it around or even re-twist it until it looks good.
Keep in mind that the shape you see is basically how the finished cozonac will look. So if it's a bit lumpy, then it will be a bit lumpy. Now is the moment to smooth any rough edges.
Braided cozonac: a bit more challenging
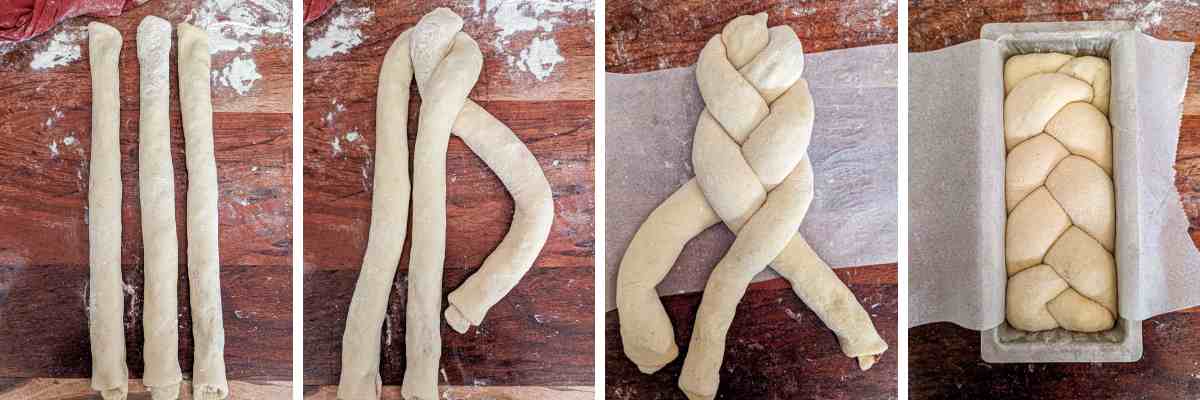
A braided cozonac is slightly more challenging because there are more moving parts, so to speak. Making a braid is not so hard, but making one with dough might be a bit difficult if you don't think of yourself as particularly nimble. Even so, a beautiful braid can be achieved if you take your time, smooth out any lumps, and re-braid if necessary.
Baking
Step 11: Move to prepared loaf pan, final proof and bake.
Prepare your loaf pan by rubbing a thick layer of butter all over the inside, and then sprinkling the butter liberally with flour. Tap off any excess flour and the pan is ready to use.
If you are using some parchment paper to move the loaf as shown above, then you only need to prepare the parts of the loaf pan that will be in contact with the dough (not the parts that will be covered by the parchment paper).
Gently lift the loaf and place it into the pan, positioning it so it sits nicely as you do.
You are now almost at the finish line. One final proof in the warm oven (50 C / 120 F) for 30-40 minutes or until the dough has puffed back up and feels airy and jiggly when gently tapped.
You can see the photo below how it looks before and after final proofing.
Once the final proof is done, take the loaf out and preheat the oven to 175 C / 350 F.
Finally, apply an eggwash and it can go into the oven.
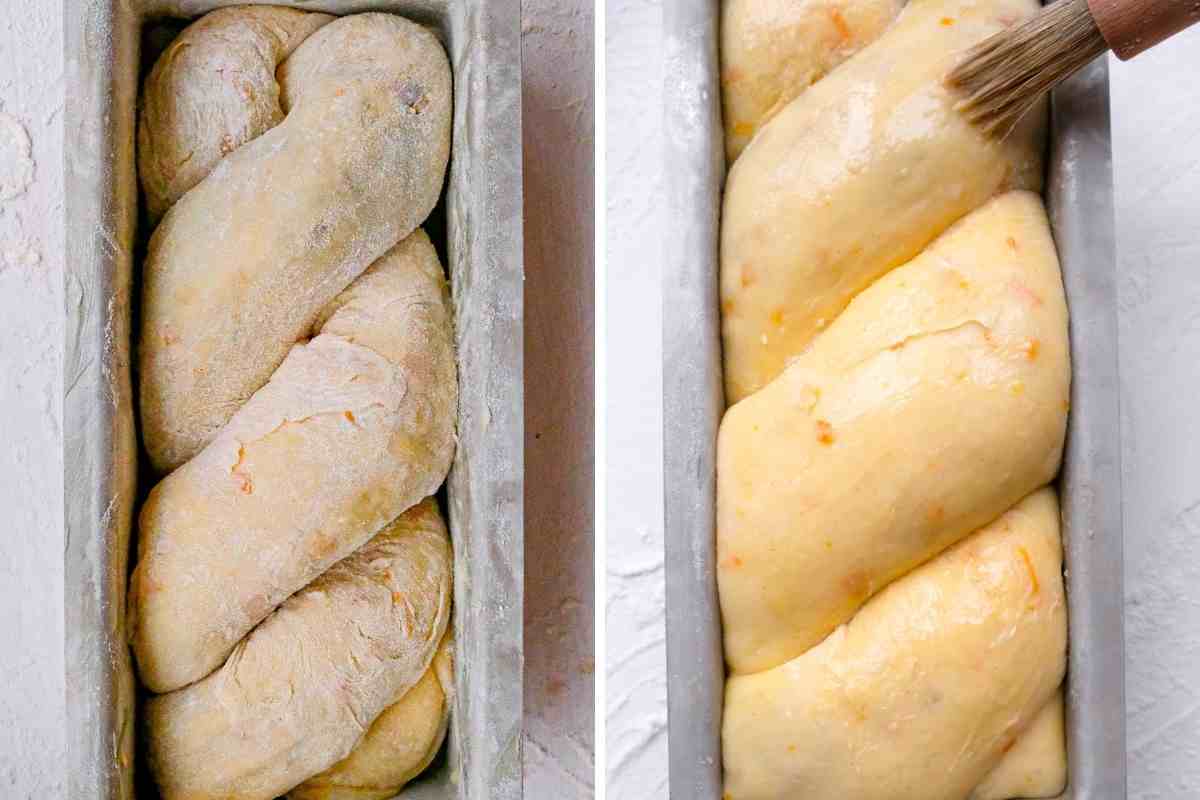
You will need to do a 2 step bake to get the color just right and to make sure the top doesn't burn.
First, bake at 175 C / 350 F for about 15 minutes or until the top of the cozonac is already turning dark brown. At this point, cover the tops with a sheet of aluminum foil and reduce the temperature to 150 C / 300 F then bake another 30 minutes.
Once finished, allow the cozonac to cool for 15-20 minutes before enjoying the fruits of your labor.
Serving and storing
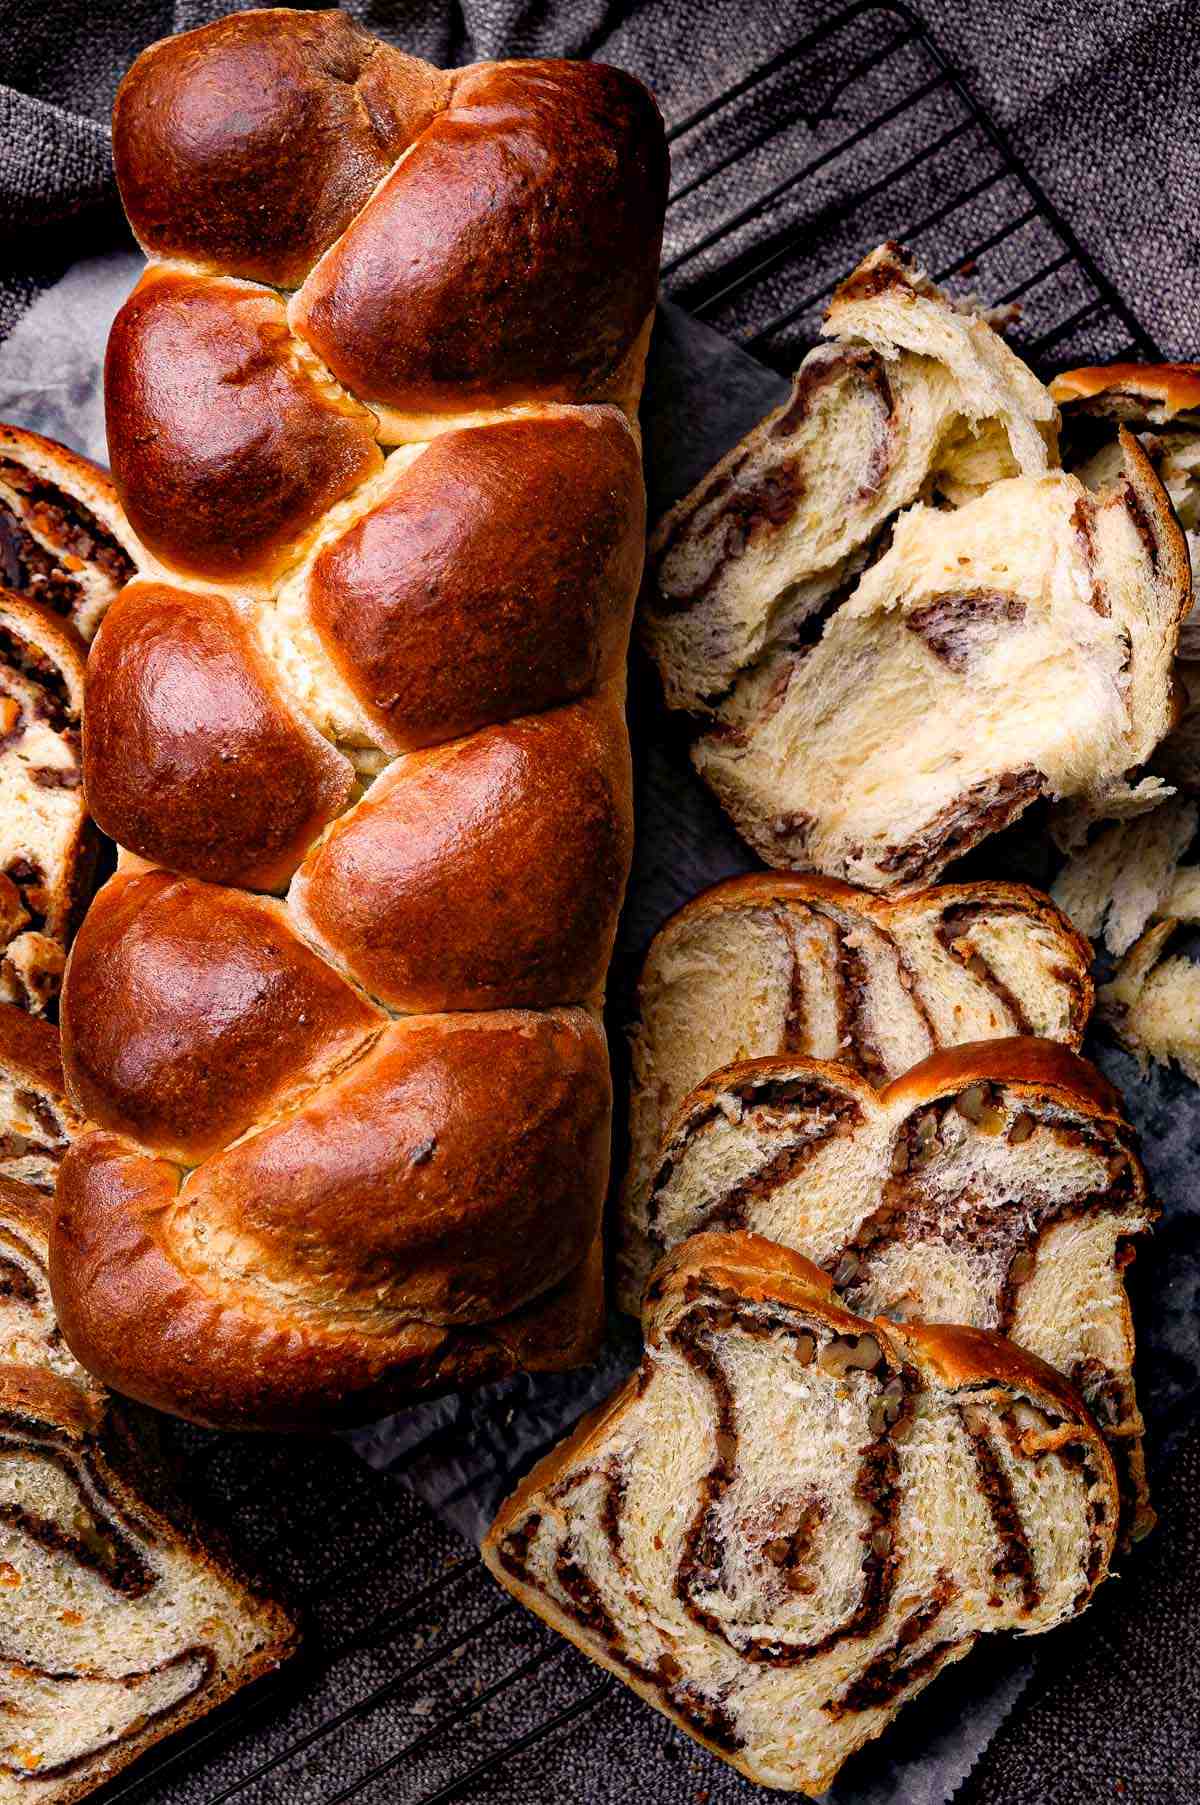
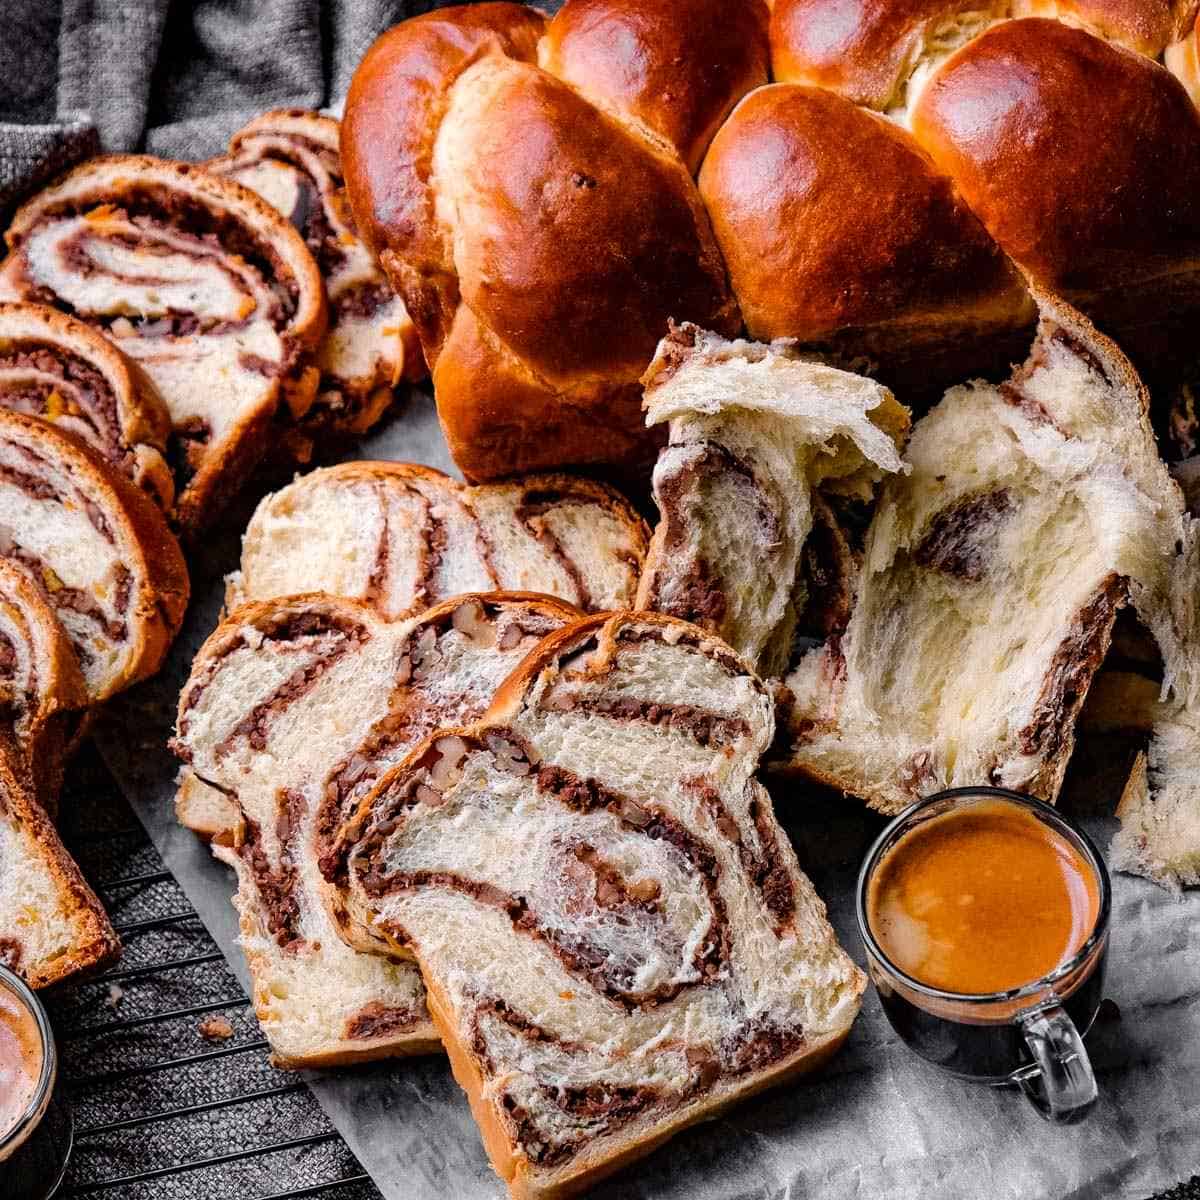
Cozonac is usually served as a dessert after Christmas dinner or Easter meals, usually pre-sliced and fanned out on a plate as shown in the photo above. Often the sliced cozonac isn't finished, so it's also enjoyed for breakfast with coffee during the holidays.
Cozonac is best stored whole in an airtight zipper bag at room temperature. A whole cozonac will stay fresh for a day or maybe 2 when stored this way.
If you end up having leftover pre-sliced cozonac, you can also store it in an airtight zipper bag at room temperature for up to 2 days. Any longer and it starts to dry out so it's better to freeze it. Alternatively you can let the slices fully dry out and make cozonac French toast.
Recipe

Perfect Cozonac Recipe (Romanian Holiday Sweet Bread)
Equipment
- 2 loaf pans see recipe post for size details
- stand mixer with dough hook attachment
- food processor for making the filling (optional)
- parchment paper for lining the pans (optional)
- aluminum foil for covering the loaves while baking
- pastry brush for eggwash
Ingredients
sponge (preferment)
- 200 grams flour
- 200 ml milk
- 14 grams dry yeast or 40 grams fresh yeast
dough
- 800 grams flour
- 200 ml milk
- 200 grams sugar
- 200 grams butter softened to room temperature
- 2 eggs
- 4 egg yolks
- zest of one lemon
- zest of one orange
- 1.5 teaspoons vanilla bean paste or substitute vanilla extract
- 1 teaspoon rum essence
- 20 ml spiced rum about 2 tablespoons
- 12 grams salt
filling
- 500 grams walnuts
- 100 grams sugar
- 80 ml milk
- 60 grams egg white about 2 egg whites
- 30 grams butter
- 12 grams cocoa powder
- 20 ml spiced rum
- 0.5 teaspoon rum essence
- 3 grams salt
extras
- 2 teaspoons vegetable oil to grease the bowl when resting the dough (optional)
- 1 tablespoon butter for preparing the loaf pans
- 1 tablespoon flour for preparing the loaf pans
- 1 egg beaten well for eggwash
Instructions
make the sponge (20 minutes)
- Make the sponge by mixing the sponge ingredients and letting it rise in a warm oven (50C / 120 F) for 15-20 minutes until bubbly.
mix the dough (30 minutes)
- Add the sponge to the bowl of the stand mixer with the rest of the dough ingredients except the butter.
- Start the mixer on low and set a timer for 10 minutes.
- After 10 minutes, set a timer for 20 minutes and begin adding the butter slowly.
- After a total of 30 minutes of mixing the dough is ready for the first proof.
proof the dough (80 minutes)
- Put the dough back in the warm oven (50 C / 120 F) for 20 minutes.
- After 20 minutes, do 3-4 stretch and folds. Then put back in warm oven for 20 more minutes.
- Repeat once more (for a total of 60 minutes in the oven) then take the dough out of the oven and do your final stretch and fold then leave it to cool and rest at room temperature for 15-20 minutes.
prepare the loaf pans and make the filling* (5 minutes)
- While the dough is proofing you can prepare the loaf pans and parchment paper (if using). If using parchment paper, cut two sheet to less than the width of your loaf pans. Prepare the loaf pans by rubbing with a layer of butter and then flour on all the surfaces that will be in contact with the dough.
- If you want some bigger nut pieces in the cozonac, set aside 100 grams. These can be either quickly pulsed in a food processor to desired consistency or rough chopped with a knife. Set them aside until ready to use.
- Add the walnuts and all the other dry ingredients for the filling to the bowl of the food processor and pulse until the mixture is fine and smooth.
- Add all the wet ingredients to the dry ingredients and pulse until a smooth paste forms.
shape (20 minutes)
- Cut the dough into two equal pieces. Cover one of them while you roll out the other.
- Cut the dough again into either 2 pieces (to make a twist shape) or 3 pieces (to make a braid shape) and roll out each of the pieces 10 cm / 4 inches longer than your loaf pan on either side and wide enough that they can be rolled into a carpet with 2-3 rotations.
- Distribute the filling equally for all the pieces of dough and spread on in a thin layer.
- Roll the pieces of dough into carpet-like rolls.
- Gently slide the parchment paper underneath the rolls positioned exactly in the middle (so you can use it to lift the shaped loaf).
- Bring together the ends of the rolls and either twist (if two pieces) or braid (if 3 pieces).
- Gently lift the loaf with the parchment paper or your hands and place it into the prepared loaf pans.
- Cover the prepared loaf with a clean kitchen cloth, and repeat this process on the remaining piece of dough.
final proof (30-40 minutes)
- Once both loaves and ready and in the loaf pans, put them back in the warm (50 C / 120 F) oven. Proof in the warm oven for 30-40 minutes or until significantly puffed up.
- Take the loaves out of the oven, and heat the oven up to 175 C / 350 F.
- Apply eggwash to the loaves.
bake (45 minutes)
- Put the loaves in the preheated oven. Set two timers: one for the total baking time of 45 minutes and another for 15 minutes.
- After 15 minutes, check on the loaves. If they are very dark brown on top already, then gently cover them with aluminum foil (like a tent) and reduce the oven temperature to 160 C / 320 F. If they are not very dark, then wait another 5 minutes before you tent them and reduce the oven temperature.
- After 45 minutes the cozonaci should be ready. Allow the cozonaci to cool for 15-20 minutes before slicing.
Notes
Nutrition
This can happen and it's happened to me before. Following directions and measurements exactly helps a lot to avoid this issue, since I've make this recipe as precise as possible, but it's the nature of sharing baking recipes that it still can. There are so many variables that can impact a bake. Your ingredients and oven could be very different from mine. Even different batches of the same butter from one manufacturer can vary slightly. The only thing you can do it move forward, adapt where necessary, and end up with a still very tasty treat and hopefully having learned something.
If the dough is too wet but you are still in the mixing stage, then continue mixing and see if it improves. If you've reached the end of the mixing stage and the dough is still very wet and loose (you can't pick it up without it slipping out of your hands or sticking all over your fingers), then dust a work surface very liberally with flour and turn the dough out. Do stretch and folds, adding flour on the top and to the work surface until the dough has absorbed enough to keep it's shape when stretched.
This means the dough needs more liquid. Depending on how dry or hard the dough is, add about 25ml of milk and continue mixing. See if it improves. Add a bit more milk in small increments until the right consistency is achieved. Be careful not to overdo it.
This can be because the gluten is not strong enough (due to not mixing enough or something related to the flour you used). In rare cases it can also be because the gluten is overworked and too tight. I've also had this happen and it isn't necessarily indicative that the cozonac will fail. As long as the dough has the right consistency and moisture level, you can still get a very fluffy nice cozonac even if the window pane test isn't exactly right.
More Romanian Recipes
Looking for other Romanian recipes? Try these:
More Baking
Here are some more recipes for sweet baked goods:







Comments
No Comments